 Tile repair is an essential skill for homeowners, especially given that the average American spends around 30 minutes per day in the bathroom, according to a study by the Bathroom Manufacturers Association. Over time, tiles can crack or loosen due to changes in temperature, humidity, or underlying structural shifts. Having the right tools on hand makes the repair process more efficient and ensures a durable, waterproof finish.
To begin your tile repair project, you’ll need to gather some essential tools. Many of these are likely already in your toolkit, while others can be found at your local hardware store. Here’s a comprehensive list of what you’ll need:
- Safety Glasses: Protect your eyes from debris and small tile fragments.
- Work Gloves: Safeguard your hands from sharp tile edges and rough surfaces.
- Utility Knife: Useful for scoring and cutting through old grout and adhesive.
- Grout Removal Tool or Oscillating Multi-Tool: These help to efficiently remove old grout around the damaged tile. According to Family Handyman, an oscillating tool can make quick work of grout removal without damaging surrounding tiles.
- Chisel and Hammer: Required for carefully chipping away broken tiles and loosening old adhesive.
- Flathead Screwdriver: Aids in prying up loose tiles and removing them.
- Tile Nippers: Helpful for making small, precise cuts in replacement tiles. The Spruce recommends this tool for fitting tiles around obstacles like pipes or fixtures.
- Tile Trowel: Used for spreading adhesive and ensuring proper bonding of the new tile.
- Grout Float: Essential for applying and spreading grout evenly across the tile surface.
- Sponge and Bucket: Necessary for wiping away excess grout and cleaning the tiles afterward.
- Tile Adhesive or Thinset Mortar: Provides a strong bond between the tile and the substrate. Choose a product suitable for your specific tile type and location.
- Grout: Seals the gaps between tiles, preventing water intrusion and maintaining a waterproof barrier. Make sure to select a grout color that matches your existing tiles.
- Silicone Sealant (optional): For areas prone to moisture, such as around a bathtub or shower, applying silicone sealant can enhance waterproofing and prevent future damage.
Having these tools ready will streamline your tile repair process and ensure a professional, long-lasting result. Investing in quality tools also means they can be used for future home improvement projects, saving you time and money in the long run.
Preparing the area for repair
Before diving into the tile repair process, it’s crucial to properly prepare the area to ensure a smooth and lasting result. Here are some essential steps and tips to help you get started:
First, clear the work area by removing any bathroom mats, decorative items, or obstacles that could hinder your movement or be damaged during the repair process. This will give you a clean, uncluttered space to work in.
Next, ensure the tile surface is clean and dry. Remove any mold, mildew, or dirt using a bathroom cleaner and a scrub brush. Allow the area to dry completely for at least 24 hours before starting the repair. This step is vital for ensuring proper adhesion and waterproofing of the new tiles.
Examine the extent of the damage carefully. Mark the tiles that need to be replaced using a pencil or marker. Be sure to check for any underlying issues, such as water damage or structural problems, that might require additional repairs before installing new tiles.
Protect surrounding tiles and fixtures by covering them with plastic sheeting or a drop cloth. This will prevent any accidental damage from debris or tools during the repair process. You can secure the sheeting with painter’s tape for easy removal afterward.
Turn off the water supply to the bathroom if you’re working near plumbing fixtures. This precaution will prevent accidental water leaks or flooding while you’re repairing the tiles.
- Always wear safety gear, including gloves and safety glasses, when handling sharp tile fragments or using power tools.
- Ensure the work area is well-ventilated, especially when using adhesives, grout, or sealants with strong fumes.
- Take accurate measurements of the tiles that need to be replaced to ensure you purchase the correct size and quantity of replacement tiles.
- Consider using a tile leveling system to maintain consistent grout lines and a flat surface, which is particularly important in bathrooms to ensure proper water drainage.
- If the damaged tiles are part of a complex pattern, you may need to sketch or photograph the layout to ensure the repair blends seamlessly with the existing design.
By thoroughly preparing the area, you’ll set the stage for a successful tile repair project. Taking the time to clean, protect, and inspect the work area will help ensure that your repair is both durable and visually appealing.
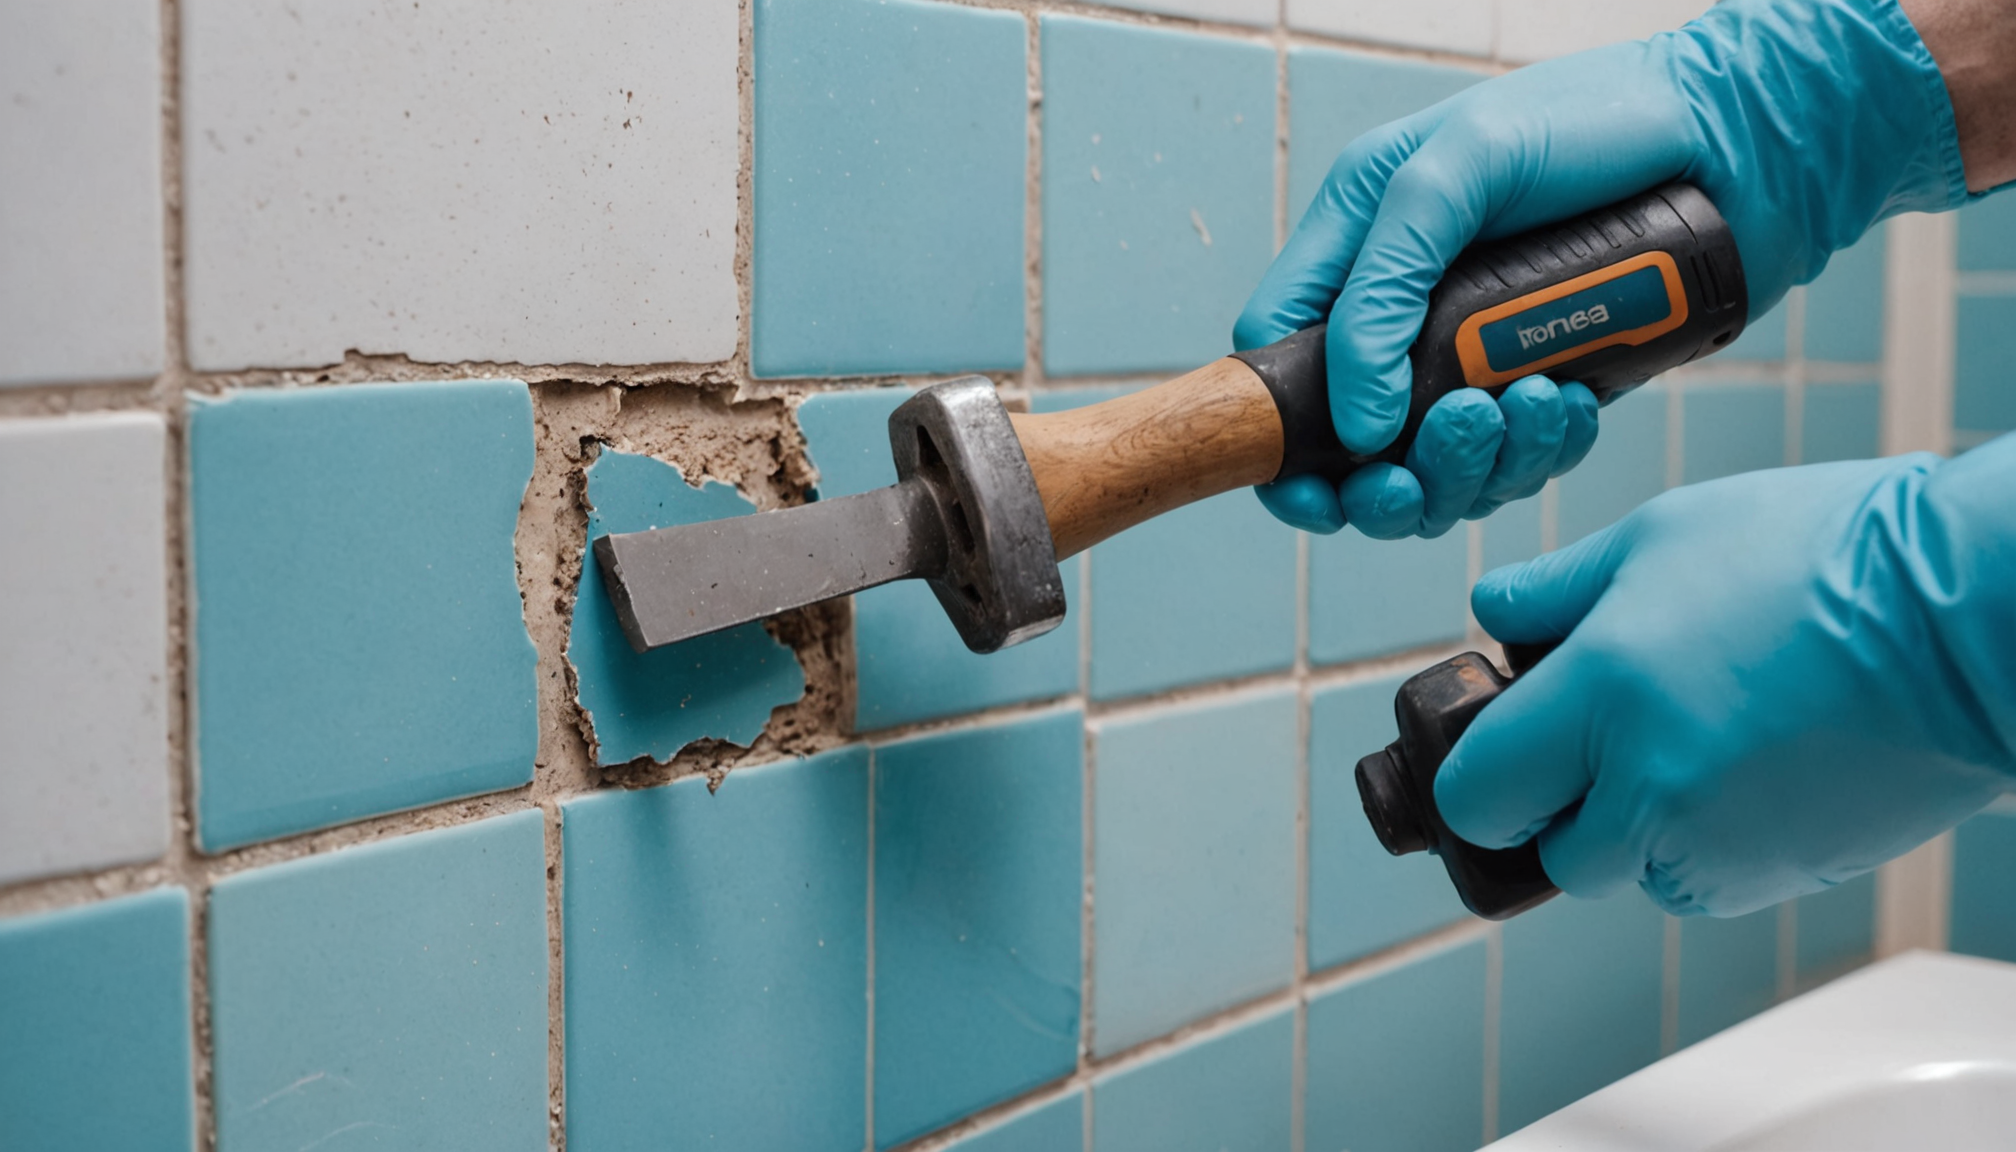
Removing broken or loose tiles
One of the most critical steps in tile repair is removing the broken or loose tiles. This process requires patience and precision to avoid damaging surrounding tiles and to ensure a smooth surface for the new tiles. Here are some common mistakes people make during this phase and how to avoid them:
Mistake 1: Rushing the Process
– Problem: Hastily removing broken tiles can lead to damage to adjacent tiles or the underlying substrate.
– Solution: Work methodically and carefully. Use a grout removal tool to gently scrape away the grout around the damaged tile. Then, using a chisel and hammer, carefully chip away at the tile, working from the center outwards.
Mistake 2: Not Wearing Proper Safety Gear
– Problem: Tile shards can be sharp and may cause injuries if not handled carefully.
– Solution: Always wear safety glasses to protect your eyes from flying debris and work gloves to safeguard your hands from sharp edges.
Mistake 3: Using the Wrong Tools
– Problem: Inappropriate tools can cause more harm than good, leading to uneven surfaces and difficulties in installing new tiles.
– Solution: Use a chisel and hammer for precise control. A flathead screwdriver can also be useful for prying up loose tiles. Avoid using overly aggressive tools that could damage the substrate or neighboring tiles.
Mistake 4: Ignoring Underlying Adhesive
– Problem: Failing to remove old adhesive can affect the bonding of the new tile.
– Solution: After removing the broken tile, use a utility knife or chisel to scrape away any remaining adhesive. Ensure the surface is clean and smooth before applying new adhesive.
Mistake 5: Overlooking Waterproofing Layers
– Problem: Damaging the waterproofing membrane underneath the tiles can lead to water intrusion and further problems down the line.
– Solution: Be cautious when chipping away at the tile and adhesive. If you notice damage to the waterproofing membrane, you may need to patch it or replace it to ensure the bathroom remains watertight.
Mistake 6: Not Checking for Structural Issues
– Problem: Ignoring underlying structural problems can lead to recurring issues with the tiles.
– Solution: Once the tile and adhesive are removed, inspect the substrate for any signs of rot, water damage, or structural instability. Address these issues before installing new tiles to prevent future repairs.
Mistake 7: Leaving Residue Behind
– Problem: Any residue left on the substrate can hinder the adhesion of the new tile.
– Solution: Clean the area thoroughly with a damp cloth or sponge to remove any dust, debris, or residue. Allow the surface to dry completely before applying new adhesive.
By avoiding these common mistakes, you can ensure a smooth and effective tile repair process. Taking the time to carefully remove broken or loose tiles sets the foundation for a durable and waterproof repair.
Installing replacement tiles
Once you’ve successfully removed the broken or loose tiles and prepared the surface, it’s time to install the replacement tiles. This step requires precision to ensure a seamless blend with the existing tiles and a waterproof finish. Here’s how to proceed:
First, measure the area where the new tile will be placed and cut the replacement tile to the correct size if necessary. Use tile nippers or a wet saw for precise cuts. Ensure you have a perfect fit before applying any adhesive.
Next, prepare the tile adhesive or thinset mortar according to the manufacturer’s instructions. Apply a generous layer of adhesive to the back of the replacement tile using a tile trowel. Spread the adhesive evenly, ensuring there are no air pockets or gaps. This step is crucial for creating a strong bond and maintaining waterproofing.
Carefully place the replacement tile into the prepared area, gently pressing it down to ensure it adheres properly to the adhesive. Use a rubber mallet or a tile tapping tool to lightly tap the tile, helping it to set evenly with the surrounding tiles.
Once the tile is in place, check for any gaps or unevenness. Use tile spacers to maintain consistent grout lines and ensure the tiles are level. Allow the adhesive to dry according to the manufacturer’s recommended time, usually 24 hours, before proceeding with the next steps.
After the adhesive has dried, it’s time to grout. Mix the grout according to the package instructions and use a grout float to apply it to the joints around the new tile. Work the grout into the joints, ensuring it’s evenly distributed and there are no air pockets. This step is essential for both the aesthetic and the waterproofing of the repair.
Allow the grout to set for about 15 to 30 minutes, then use a damp sponge to wipe away excess grout from the tile surface. Be careful not to remove grout from the joints. Let the grout dry for the recommended time, usually another 24 hours.
Finally, apply a silicone sealant around the edges of the newly installed tiles, especially if they are near moisture-prone areas like a bathtub or shower. This will enhance waterproofing and prevent future damage.
Key takeaways for installing replacement tiles:
– Measure and cut replacement tiles precisely for a seamless fit.
– Apply adhesive evenly to ensure a strong bond and waterproofing.
– Use tile spacers to maintain consistent grout lines.
– Grout the joints carefully to prevent water intrusion.
– Apply silicone sealant for added waterproofing in moisture-prone areas.
By following these steps, you’ll achieve a professional-looking tile repair that blends seamlessly with your existing bathroom tiles and ensures long-lasting waterproofing. Don’t be intimidated by the process—with the right tools and techniques, you can restore your bathroom to its former glory. Keep going, and soon you’ll have a bathroom that looks as good as new!
Grouting and sealing repaired area
- What if I grout too much and it dries on the tile surface?
- If excess grout dries on the tile surface, you can use a grout haze remover or a mixture of white vinegar and water to gently scrub it off. Be sure to test a small area first to ensure it doesn’t damage the tile.
- How long should I wait before using the shower after re-grouting tiles?
- It’s recommended to wait at least 24 to 48 hours after grouting to allow the grout to fully cure. This ensures proper waterproofing and prevents any damage to the fresh grout.
- Can I use regular caulk instead of silicone sealant for waterproofing?
- Silicone sealant is specifically designed for areas with high moisture exposure, like bathrooms. Regular caulk may not provide the same level of waterproofing and can degrade faster in damp environments.
- Is it necessary to seal grout after a tile repair?
- Yes, sealing the grout is an important step to enhance waterproofing and protect the grout from stains, mold, and mildew. This helps maintain the longevity and appearance of your repair.
- What if the color of the new grout doesn’t match the old grout?
- If there is a noticeable difference in color, you might consider re-grouting the entire section or area to ensure a uniform appearance. Alternatively, you can use a grout colorant to match the new grout to the old.